

Crystal Clear Epoxy Table Top Resin, 2 Gallon Kit
Product Description
Crystal Clear Epoxy Table Top Resin, 2 Gallon Kit; Crystal clear system designed for table tops, bars, art work & other applications requiring a clear, plastic coating. Not recommended for projects that will be in direct sunlight. Includes Part A & B.
The original Table Top Epoxy kit is sold around the world and is among the clearest epoxies you will find. Our formula is UV resistant and is great for Bar tops, Table Tops, and many arts and crafts projects. Perfect for the Do-it-yourselfer or the professional. CRYSTAL CLEAR EPOXY is THE CLEAREST Epoxy Resin Countertop Kit you will find on the market, and is the best epoxy resin for wood, DIY river tables, epoxy live edge tables, epoxy inlay in wood, epoxy resin tabletop repairs, epoxy resin wood art, and much more.
Our formula makes this product perfect for:
✔ Using epoxy resin on kitchen countertops
✔ Epoxy resin tabletop DIY projects
✔ Wood and epoxy resin tables
✔ Laminating wood with epoxy resin
✔ Perfect for epoxy resin color pigments and all countertop epoxy colors.
Size: 2 Gallon Kit
We highly recommend testing a sample piece before beginning your final project.
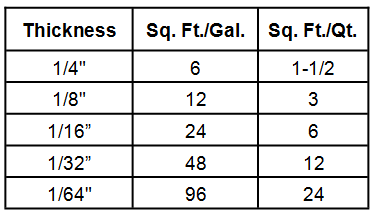
While using Epoxy Table Top Resin in castings, we recommend using thin pours of no more than 1/4”.
We recommend using the chart below to estimate coverage and thickness.

Directions for Use:
Step 1: The ideal working temperature is around 77°F. Best results can be obtained at temperatures between 70°F and 85°F, in a clean, dry, dust-free environment. Avoid working in high humidity. We recommend using this product on a leveled and flat work surface.
Step 2: Using the Laminate Coverage Chart, measure product in accordance with your intended use. Prepare 1 part Base Resin to 1 part Curing Agent by liquid volume or 100 parts Base Resin to 83 parts Curing Agent by weight. Pour the Curing Agent first and then the Base Resin into a clean, smooth-sided container large enough to hold all the liquid and allow room for mixing.
Step 3: The material must be mixed thoroughly for at least 3 minutes. Be sure to scrape the container sides, bottom, and corners as you mix. Be careful to not whip excessive air into the mixture. If mixing a gallon, use a power mixer set to hand speed. For smaller quantities, use stir sticks. Do not mix more than a gallon.
Step 4: Pour the mixed resin onto the surface and distribute evenly with a squeegee or gloved hand. Continue to pour remaining material to achieve the desired thickness, allowing the resin to flow evenly over the project's sides.
Step 5: See Additional Information for guidance to help eliminate bubbles that have risen to the surface of the resin.
Step 6: If you are going to make a second pour, the first pour should still be lightly sticky. Once the second pour is made, bubbles may once again need to be removed. Material will feel well-cured after 24 hours, but full cure and maximum hardness can require up to 7 days depending upon the temperature.


